久しぶりに0からのサーバー構築した。
前回は2015年5月、OSはCentOS7だった。
ハードウエアは、2013年購入、Core i7-4770、メモリ8GB、SSD120GB、HDD1TB。
その後、CentOSの開発が終了し長らく放置してしまったが、Alma Linuxへアップグレードしたのは2025年になってからだった。
OS的にはまだ使えたのだが、ハードウェアがぼちぼち寿命だった。
ファンが劣化してきて騒々しいハム音がするようになり、うっかりすると起動に失敗するようになってきていた。
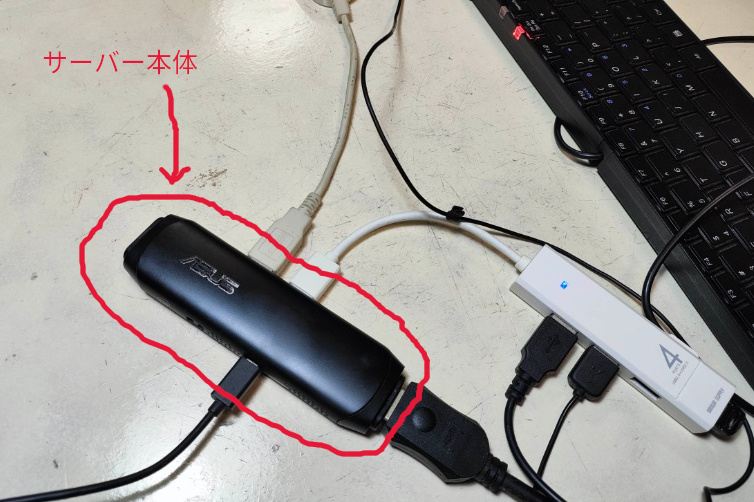
新しいハードの交換しなくては、とようやく用意したのはASUS Stick PC、VivoStick。
Atom x5-Z8350 4GB SSD 64GB 2017年発売
OSとしてはxubuntu 24.10をインストールしてあった。
有線LAN接続したかったため、TP-LinkのUSB有線LANアダプタを購入した。
またそのままではディスク容量が不安だったため、256GBのUSBメモリを購入。
USBメモリはext4でフォーマットして、fstabを書き換え、/homeとしてマウントした。
UUID=(SSD)/ ext4 errors=remount-ro 0
1
UUID=(SSDのefi領域0495-99DF /boot/efi vfat umask=0077 0 1
/swapfile none swap sw 0
0
UUID=(USBメモリ) /home ext4 defaults 0
1
元々の/home/(ユーザー)ディレクトリをコピーした。
その上でサーバー化する。
httpサーバーとして構成はユーザーディレクトリを設定し、
/var/www/html/index.html
—/home/ユーザー1
—/home/ユーザー2/pubulic_html/(index.html以下、html1.2相当のホームページ)
—/home/ユーザー3/pubulic_html/(WordPressサイト)
上記の構成
まずはsshサーバー、インストール。
$ sudo apt-get install ssh
$ sudo systemctl enable ssh
ユーザー1としてDropboxインストール
ログインしてGUIより所定の設定。
デーモンとしてのdropbox設定
cd ~ && wget -O – “https://www.dropbox.com/download?plat=lnx.x86_64” | tar xzf –
新規作成した.dropbox-distフォルダから Dropbox デーモンを実行
~/.dropbox-dist/dropboxd
Dropbox 起動用ファイルを作る
/usr/lib/systemd/system で $ sudo vi dropbox.service を実行してファイルを作る。
…[Install]
WantedBy=multi-user.target
起動用ファイルを systemd に登録する
$ sudo systemctl enable dropbox
Created symlink ‘/etc/systemd/system/multi-user.target.wants/dropbox.service’ → ‘/usr/lib/systemd/system/dropbox.service’.
ftpサーバー、インストール
$ sudo apt install vsftpd
$ vi /etc/vsftpd.conf
# 31行目 : コメント解除 (書き込み許可)
write_enable=YES
…ls_recurse_enable=YES
$ vi /etc/vsftpd.chroot_list
# 上の階層へ移動を許可するユーザーを 1 行ずつ記載
ユーザー1
$ systemctl restart vsftpd
再起動
スケルトンフォルダーにpublic_html追加
$ sudo mkdir /etc/skel/public_html
httpサーバーはapache2をインストールした。
$ sudo apt install apache2
$ sudo vi /etc/apache2/conf-enabled/security.conf
# 12行目 : 変更
ServerTokens Prod
HTTPリプライヘッダには最小限の情報しか表示されないようになる
$ sudo vi /etc/apache2/mods-enabled/dir.conf
# ディレクトリ名のみでアクセスできるファイル名を設定
DirectoryIndex index.html index.cgi index.pl index.php index.xhtml index.htm
$ sudo vim /etc/apache2/sites-available/mysite.conf
ServerName 自サーバー名記載
ServerAdmin メールアドレス
DocumentRoot /var/www/html
ErrorLog ${APACHE_LOG_DIR}/error.log
CustomLog ${APACHE_LOG_DIR}/access.log combined
/etc/apache2/sites-available/000-default.confを無効化
$ sudo a2dissite 000-default.conf
Site 000-default disabled.
Enabling site mysite.
/etc/apache2/sites-available/mysite.confを有効化
$ sudo a2ensite mysite.conf
Apache2 再起動
sudo systemctl restart apache2.service
/etc/hosts編集
127.0.0.1 サーバー名 サーバー名 localhost.localdomain localhost
::1 localhost6.localdomain6 localhost6
192.168.0.50 サーバー名 サーバー名 localhost.localdomain
localhost
/etc/hostname
hostnamectl set-hostname サーバー名
$ sudo hostnamectl set-hostname サーバー名(FQDN:完全修飾ドメイン名)
一般ユーザーが自身のホームディレクトリ内に置いたファイルを Web サイトとして公開できるように設定
$ sudo a2enmod userdir
$ sudo systemctl restart apache2.service
任意の一般ユーザーでテストページを作成して動作確認
$ mkdir ~/public_html
$ chmod 711 $HOME
$ chmod 755 ~/public_html
$ vi ~/public_html/index.html
以下記述
<html>
<body>
<div style="width: 100%; font-size: 40px; font-weight: bold; text-align: center;">
UserDir Test Page
</div>
</body>
</html>
ブラウザで、テスト表示確認
ユーザー作成
$ sudo adduser ユーザー2
$ sudo adduser ユーザー3
$ su ユーザー2
$ chmod 711 $HOME
$ chmod 755 ~/public_html
ftpで/home/ユーザー2/public_html/以下にアップロード
$ chmod -R 707 ~/public_html
http://localhost/~ユーザー2/
表示確認
phpインストール
$ sudo apt install php php-mbstring php-pear libapache2-mod-php php-mysql php-fpm php-xmlrpc php-soap php-intl
PHP 8.3インストールされる
$ sudo vi /etc/php/8.3/apache2/php.ini
upload_max_filesize = 128M
$ sudo vi /etc/php/8.3/fpm/php.ini
upload_max_filesize = 128M → 反映される
MariaDBをインストール
$ sudo apt-get install mariadb-server mariadb-client
$vi /etc/mysql/mariadb.conf.d/50-server.cnf
# 95行目 : デフォルトの文字コードを確認
# 絵文字等 4バイト長の文字を扱う場合は [utf8mb4]
character-set-server = utf8mb4
collation-server = utf8mb4_general_ci
$ sudo systemctl restart mariadb
再起動
MariaDB の初期設定
新しいバージョンの MariaDB ではコマンドが下記に変更
$ sudo mariadb-secure-installation
MySQL rootユーザー、パスワード設定
NOTE: RUNNING ALL PARTS OF THIS SCRIPT IS RECOMMENDED FOR ALL MariaDB
SERVERS IN PRODUCTION USE! PLEASE READ EACH STEP CAREFULLY!
In order to log into MariaDB to secure it, we’ll need the current
password for the root user. If you’ve just installed MariaDB, and
haven’t set the root password yet, you should just press enter here.
Enter current password for root (enter for none): → rootパスワード設定
OK, successfully used password, moving on…
Setting the root password or using the unix_socket ensures that nobody
can log into the MariaDB root user without the proper authorisation.
You already have your root account protected, so you can safely answer ‘n’.
Switch to unix_socket authentication [Y/n] n
… skipping.
You already have your root account protected, so you can safely answer ‘n’.
Change the root password? [Y/n] n
… skipping.
By default, a MariaDB installation has an anonymous user, allowing anyone
to log into MariaDB without having to have a user account created for
them. This is intended only for testing, and to make the installation
go a bit smoother. You should remove them before moving into a
production environment.
Remove anonymous users? [Y/n] Y
… Success!
Normally, root should only be allowed to connect from ‘localhost’. This
ensures that someone cannot guess at the root password from the network.
Disallow root login remotely? [Y/n] Y
… Success!
By default, MariaDB comes with a database named ‘test’ that anyone can
access. This is also intended only for testing, and should be removed
before moving into a production environment.
Remove test database and access to it? [Y/n] Y
– Dropping test database…
… Success!
– Removing privileges on test database…
… Success!
Reloading the privilege tables will ensure that all changes made so far
will take effect immediately.
Reload privilege tables now? [Y/n] Y
… Success!
Cleaning up…
All done! If you’ve completed all of the above steps, your MariaDB
installation should now be secure.
Thanks for using MariaDB!
$ sudo mysql -u root -p
Enter password: (MariaDBのrootパスワード入力)
MariaDB [(none)]>create database wordpress;
Query OK, 1 row affected (0.002 sec)
MariaDB [(none)]>grant all privileges on wordpress.* to wordpress@localhost identified by ‘パスワード’;
← wordpressユーザ作成 パスワード パスワード
MariaDB [(none)]>exit
WordPress用、データベース及びユーザーを作成
WordPress ダウンロード
$ su ユーザー3
$ wget https://ja.wordpress.org/latest-ja.tar.gz
$ tar zxvf latest-ja.tar.gz -C ./public_html/
/home/ユーザー3/public_html/以下にwordpress/フォルダが作られ、そこに展開される
$cd ./public_html/wordpress/
$ mv ./* ../
/home/ユーザー3/public_html/以下にWordpress関連ファイルを再展開
$ sudo chown -R www-data:www-data /home/ユーザー3/public_html
$ sudo chmod -R 755 /home/ユーザー3/public_html
Apache2設定ファイル作成
$sudo vi /etc/apache2/conf-available/wordpress.conf
Timeout 600
ProxyTimeout 600
DirectoryIndex index.php index.html index.htm
<Directory “/home/ユーザー3/public_html”>
Options FollowSymLinks
AllowOverride All
Require all granted
SetHandler “proxy:unix:/var/run/php/php8.3-fpm.sock|fcgi://localhost/”
$ sudo a2enconf wordpress
Enabling conf wordpress.
To activate the new configuration, you need to run:
systemctl reload apache2
WordPress設定
http://(サーバーIPアドレス)/~ユーザー3/wp-admin/setup-config.php
データベース名 wordpress
ユーザー wordpress
パスワード (パスワード)
元のWordPressからのインポート
All in one WP Migrationを使用
以下参照
画像データは別に移動
$ sudo chmod -R 777 /home/ユーザー3/public_html/wp-content/
→ ftpでアップロードできなかったので許可ゆるく
$ sudo chmod -R 777 /home/ユーザー3/public_html/wp-content/
アップロード後に再入力で画像表示される
ipアドレス、固定
GUIにて設定
ddo.jpからドメイン取得
$ /usr/bin/wget -O – ‘http://free.ddo.jp/dnsupdate.php?dn=自分のサーバー名&pw=パスワード’ > /dev/null
ホームディレクトリにスクリプトファイル作成
$ vi ~/ddo.jp.sh
# !/bin/sh
/usr/bin/wget -O – ‘http://free.ddo.jp/dnsupdate.php?dn=サーバー名&pw=パスワード’ > /dev/null
$ sudo vi /etc/systemd/ddo.jp.service
[Unit]
Description=dns update
After=network.target
[Service]
User=ユーザー1
ExecStart=/home/ユーザー1/ddo.jp.sh
Restart=always
type=simple
[Install]
WantedBy=multi-user.target
起動時にddo.jpからドメイン名取得
$ sudo systemctl enable /etc/systemd/ddo.jp.service
Cronで定期実行
$ sudo systemctl status cron
$ sudo crontab -e
14,46 * * * * /usr/bin/wget -O – ‘http://free.ddo.jp/dnsupdate.php?dn=自サーバー名&pw=パスワード’ > /dev/null
WordPressのダッシュボードにアクセスできなくなっていたが、リンク先のipアドレスがインストール時のものに固定されていた。
$ vi ./public_html/wp-config.php
追記
define( ‘WP_HOME’, ‘http://自サーバー名/~ユーザー3/’ );
define( ‘WP_SITEURL’, ‘http://自サーバー名/~ユーザー3/’ );
ようやく、Wordpressにログインできた。
サーバー構築しようと256GBのUSBメモリ購入してから、2ヶ月半かかってしまった。
ようやく、サーバー移行。